Create A Rest Service With NestJS
In today's tutorial we are going to create a rest service with NestJS. NestJS builds on top of NodeJS and ExpressJS. However, you can change the underlying HTTP server framework to Fastify if you want.
A progressive Node.js framework for building efficient, reliable and scalable server-side applications. - NestJS Homepage
Installation
To get started you need to install the Node Package Manager (NPM). Usually, the package manager comes with the installation of NodeJS, which is also required. After that you can install the NestJS Command Line Interface (CLI) via NPM. Don't forget to use the -g parameter. Via the -g parameter the installed packages is globally available, otherwise the installed packages are only available in the selected (current) project.
npm i -g @nestjs/cliYou can check if the installation was successful by running the nest command. Try to create a new project, if no error is thrown everything went well. I used NPM as package manager, but if you rather want yarn feel free to do so.
nest new rest-serviceThis process could take some minutes complete. The CLI is scaffolding the project and installing all required packages.
⚡  We will scaffold your app in a few seconds..

CREATE rest-service/.eslintrc.js (663 bytes)
CREATE rest-service/.prettierrc (51 bytes)
CREATE rest-service/nest-cli.json (64 bytes)
CREATE rest-service/package.json (1894 bytes)
CREATE rest-service/README.md (3370 bytes)
CREATE rest-service/tsconfig.build.json (97 bytes)
CREATE rest-service/tsconfig.json (339 bytes)
CREATE rest-service/src/app.controller.spec.ts (617 bytes)
CREATE rest-service/src/app.controller.ts (274 bytes)
CREATE rest-service/src/app.module.ts (249 bytes)
CREATE rest-service/src/app.service.ts (142 bytes)
CREATE rest-service/src/main.ts (208 bytes)
CREATE rest-service/test/app.e2e-spec.ts (630 bytes)
CREATE rest-service/test/jest-e2e.json (183 bytes)

? Which package manager would you ❤️  to use? npm
√ Installation in progress... ☕

�  Successfully created project rest-service
�  Get started with the following commands:

$ cd rest-service
$ npm run start
Your terminal output should look similar to the above. Now, by changing into the current directory and starting the NestJS project we already got a running instance.
> nest start

[Nest] 14536   - 2020-10-19 18:57:58   [NestFactory] Starting Nest application...
[Nest] 14536   - 2020-10-19 18:57:58   [InstanceLoader] AppModule dependencies initialized +19ms
[Nest] 14536   - 2020-10-19 18:57:58   [RoutesResolver] AppController {}: +7ms
[Nest] 14536   - 2020-10-19 18:57:58   [RouterExplorer] Mapped {, GET} route +3ms
[Nest] 14536   - 2020-10-19 18:57:58   [NestApplication] Nest application successfully started +3ms
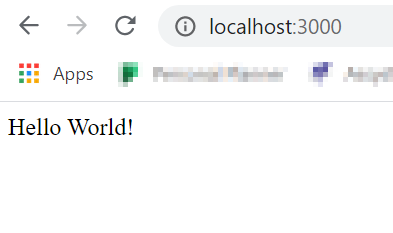
The default port of a NestJS project is bound to 3000. By hitting up http://localhost:3000/ in your browser you should get a "Hello World!" message. Keep in mind that every request you made by navigation to a URL is an HTTP GET request.
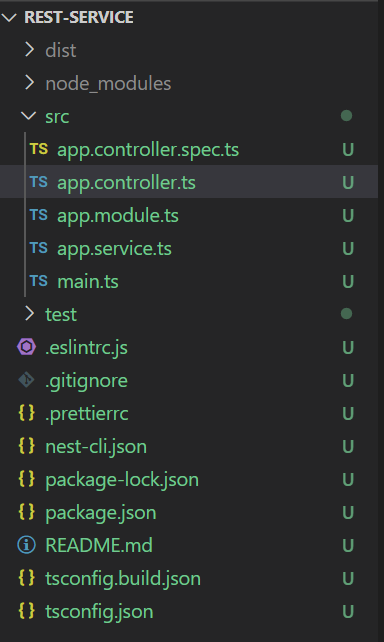
You can see the default source code layout in the next image.
Controllers (Endpoints)
Responsible for any interaction with other services are so-called controllers. Those controllers provide all available HTTP Endpoints and Methods which can be consumed by clients. As we said earlier, the default GET Method returns "Hello World!". This GET Method is defined in the app.controller.ts file.
@Controller()
export class AppController {
  constructor(private readonly appService: AppService) {}

  @Get()
  getHello(): string {
    return this.appService.getHello();
  }
}
Well, as you see the getHello() function has a @Get() decorator. NestJS is heavily built on the concept of decorators. As you might have guessed, all other HTTP methods are also available via decorators (e.g. POST, PUT, DELETE, PATCH etc.). To complete this code sample, the actual "Hello World!" string is injected via the appService.
To make any service available via dependency injection decorate the service with @Injectable(). Now this service can be consumed by any other component.
@Injectable()
export class AppService {
  getHello(): string {
    return 'Hello World!';
  }
}
Create A Custom Controller
To create a new controller let us use the CLI. It is the easiest way because the CLI automates redundant tasks and minimizes the risk of errors. Let's go for a weather controller. This syntax is very similar to Angular. The g command is a shortcut for generate.
nest g controller weather
The terminal should print something like this.
CREATE src/weather/weather.controller.spec.ts (499 bytes)
CREATE src/weather/weather.controller.ts (103 bytes)
UPDATE src/app.module.ts (334 bytes)
So, the controller and the correspondending tests - the spec file - were successfully generated. In addition to that the new controller was added to the module file.
By now the Weather controller is pretty basic.
@Controller('weather')
export class WeatherController {}
The next step is to add some HTTP methods. For this demo, I will stick to the most basic one - the GET method.
import { Controller, Get } from '@nestjs/common';
import { Weather } from 'src/entities/weather';

@Controller('weather')
export class WeatherController {
  @Get()
  public getWeather(): Weather {
    const randomTemperature = Math.round(Math.random() * 30 * 100) / 100;
    const weather = { temperature: randomTemperature, city: this.getCity() };

    return weather;
  }

  private getCity() {
    const cities = [
      'Vienna',
      'Berlin',
      'Paris',
      'Rome',
      'Madrid',
      'Lisboa',
      'Prague',
      'London',
    ];
    return cities[Math.floor(Math.random() * cities.length)];
  }
}
As you have noticed, I introduced a Weather interface. Through this you will see a JSON response in the browser window, or any client who calls this endpoint. The serialization and deserialization happens out of the box.
export interface Weather {
  temperature: number;
  city: string;
}
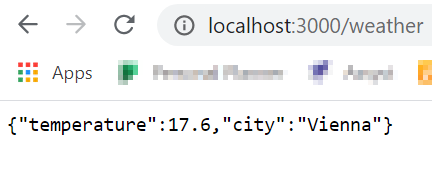
When you start the NestJS project and hit up the /weather endpoint you should see different values every time you refresh the page. This is intentional because we used random values for temperature (0 - 30) and a random city selector.
That's it. You have successfully created a NestJS project, added a custom controller and returned data as a JSON representation. For more details have a look at the official NestJS documentation.
Happy hacking as always!